In our class you will have one main folder. We want to make a bunch of projects for the class, but they all need to be in this folder. The easiest way to do this is to create a subfolder for each of your assignments, then create site definitions to match each subfolder.
Here's our goal
main folder, containing:
Each project has a folder inside the main folder. The folders will be named project1, project2, etc. There will be matching folders on your local computer and on the server.
If you have not already done so, configure Dreamweaver to connect to your site. From the menu, select Site -> Manage Sites. If you see your site, great, just choose it and done.
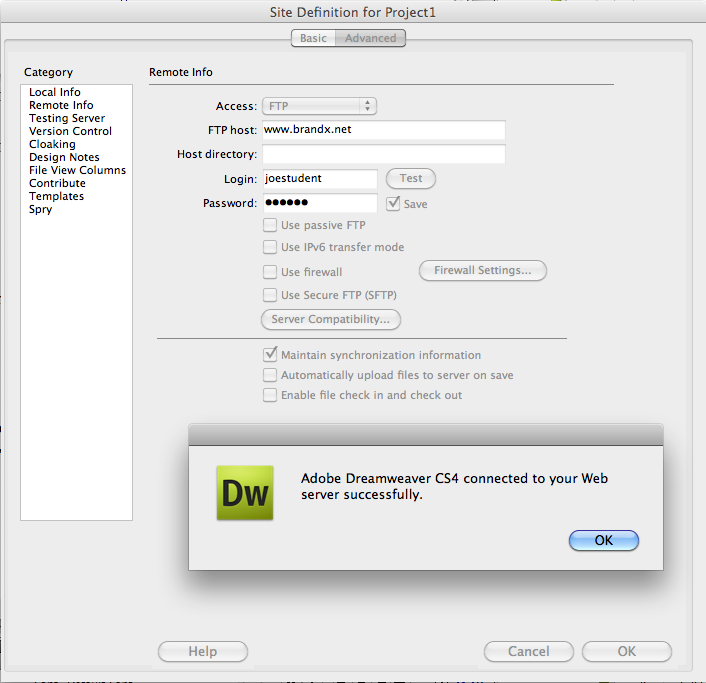
If not, then we will add this site. Select "New". Configure your site using the username and password and servername you were given. For people in this class, your username is your human name, with no capitals and no spaces. Your password was given to you in class. The servername is www.brandx.net.
Test the connection by clicking the "test" button.
A happy connection looks like this:

Great, we have configured Dreamweaver to connect to the site. If you are still configuring the site, just click through the rest of the dialog boxes and save the site.
Note: the username and password will vary by user and by quarter. Username and password will be handed out in class and will NOT be posted here on this website! If you try the information posted here it's not going to work because you need the real username and password.
Once we are connected to the site, creating a folder is easy.
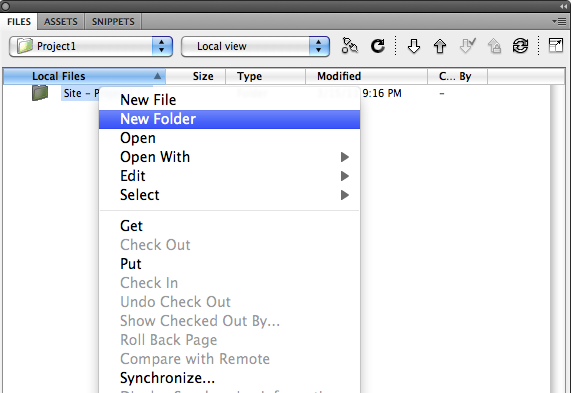
Referring to the next diagram, make sure that your project is selected in the first column (here we have Project 1) and make sure that the second item is set to "Local view". Right click on the folder item and a menu comes up. Select new folder.

Name the new folder "project2". If you have done it right your file list will look like this:

OK, we have made our folder.
This folder is on the the local server so hilight it and then hit the uparrow to upload it. A little box will come up and tell you if you are successful. Check this carefully, it's important.
Now let's make a new site configuration to connect directly to the new folder.
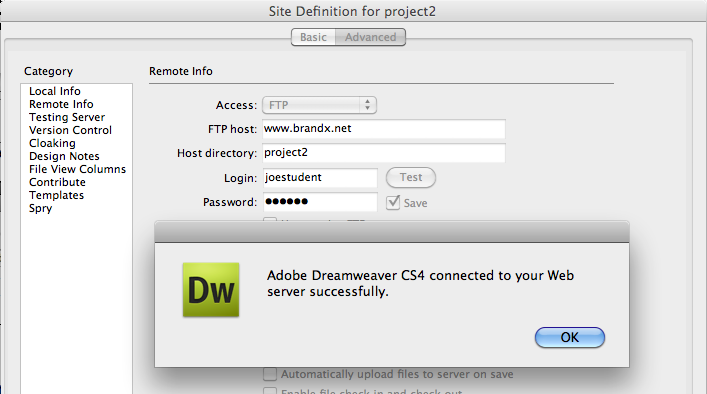
Select site -> Manage sites -> new and create a new site with the name "project2" matching the name of our new folder. Use the same settings as before, except, the name of the site is "project2" and the folder is called "project2".
Test the connection. Should look something like this:

Remember: you have to copy the folder to the server or this won't work. And when you configure the second site, you have to include the folder name (see image above) as part of the configuration.
If the test works, then you've set up the nested folder correctly.
To create a subsite in a folder nested in your main folder, first create a folder, then upload it. Then configure a new site, using the folder as its main folder. You will get one site within the other. Since students in this class only have one folder, you will have to do this to create separate separate folders and projects for the various projets we do in this class. In the end, they will all be in the same folder together.